Why You’ll Love This Recipe
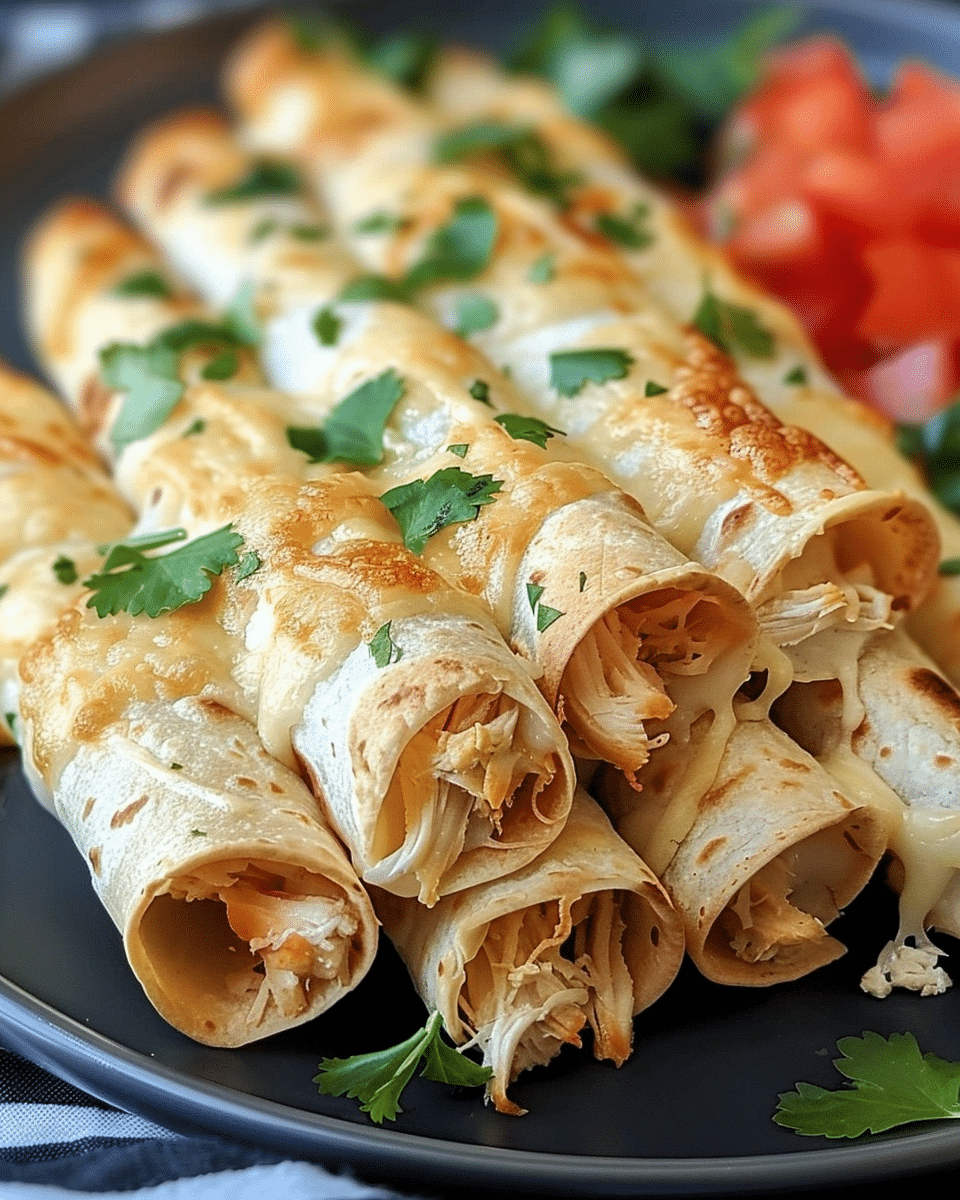
These Baked Cream Cheese Chicken Taquitos offer everything you love about traditional taquitos—crispy, flavorful, and cheesy—but with a lighter, oven-baked twist. The cream cheese filling adds a deliciously rich and creamy texture, perfectly complementing the shredded chicken and melted cheese. You can make these taquitos ahead of time and bake them when you’re ready to serve, making them a fantastic choice for busy nights or gatherings. Plus, they’re so customizable—add your favorite seasonings or toppings to make them your own!
Ingredients
(Tip: You’ll find the full list of ingredients and measurements in the recipe card below.)
- 2 cups of cooked shredded chicken (rotisserie chicken works perfectly)
- 4 oz cream cheese, softened at room temperature
- ½ cup shredded cheddar or Monterey Jack cheese
- 1 tablespoon taco seasoning (optional)
- 8 small flour tortillas
- Cooking spray (or oil) for spraying
- Salt and pepper, to taste
Directions
- Preheat the Oven: Preheat your oven to 375°F (190°C) and line a baking sheet with parchment paper or lightly grease it with cooking spray.
- Prepare the Filling: In a medium bowl, combine the cooked shredded chicken, softened cream cheese, and shredded cheddar or Monterey Jack cheese. If you’re using taco seasoning, add it in along with a pinch of salt and pepper. Mix everything together until fully combined and creamy.
- Assemble the Taquitos: Warm the tortillas slightly in the microwave for about 15 seconds to make them more pliable. Spoon about 2 tablespoons of the filling onto the center of each tortilla. Roll the tortilla tightly around the filling, folding in the sides as you go to form a taquito. Repeat with the remaining tortillas and filling.
- Bake the Taquitos: Place the rolled taquitos seam-side down on the prepared baking sheet. Lightly spray them with cooking spray or brush with a little oil for extra crispiness. Bake in the preheated oven for 15-20 minutes, or until golden brown and crispy.
- Serve: Once baked, remove the taquitos from the oven and let them cool slightly. Serve with your favorite dipping sauces, such as salsa, guacamole, or sour cream.
Servings and Timing
- Servings: 4-6 (depending on serving size)
- Total Time: 30 minutes
Variations
- Spicy Taquitos: Add a diced jalapeño or a dash of hot sauce to the cream cheese filling for an extra kick.
- Vegetarian Version: Replace the chicken with black beans and corn for a vegetarian option.
- Cheese Variety: Use a mix of cheese such as pepper jack, mozzarella, or even queso fresco for different flavors.
- Add Veggies: Toss in some finely chopped onions, bell peppers, or spinach for added texture and flavor.
Storage/Reheating
- Storage: Leftover taquitos can be stored in an airtight container in the fridge for up to 3 days.
- Reheating: To reheat, place taquitos on a baking sheet and bake at 350°F (175°C) for 10-15 minutes, or until heated through and crispy. Alternatively, you can reheat them in the microwave, but they may not stay as crispy.
FAQs
Can I use corn tortillas instead of flour?
Yes, you can use corn tortillas, but they might crack more easily. To make them more pliable, heat them in a dry skillet for a few seconds or briefly microwave them.
Can I use store-bought rotisserie chicken?
Yes, rotisserie chicken works perfectly for this recipe, saving you time and adding extra flavor.
Can I freeze these taquitos?
Yes, you can freeze the taquitos before baking. Arrange them on a baking sheet in a single layer, freeze for 1-2 hours, then transfer them to an airtight container or freezer bag. To cook, bake directly from frozen at 375°F (190°C) for 20-25 minutes.
Can I add other ingredients to the filling?
Absolutely! Feel free to add sautéed onions, bell peppers, or even a little bit of cream of chicken soup for a richer filling.
What is the best dipping sauce for taquitos?
Sour cream, guacamole, salsa, or even a creamy cilantro-lime sauce are all excellent choices for dipping.
Can I make these taquitos ahead of time?
Yes, you can prepare the taquitos ahead of time, store them in the fridge, and bake them when you’re ready to serve. They will stay fresh for about 2-3 days.
Can I use a different kind of cheese?
You can use any cheese you like! Monterey Jack, mozzarella, or pepper jack would all be great choices in place of cheddar.
How do I keep the taquitos crispy after baking?
Spraying the taquitos with cooking spray or brushing them lightly with oil before baking helps achieve a crispy, golden texture.
How do I prevent the taquitos from unrolling while baking?
Make sure to roll the taquitos tightly and place them seam-side down on the baking sheet to keep them from opening up during baking.
Can I make the filling without cream cheese?
You can substitute cream cheese with sour cream or Greek yogurt for a tangy twist, but the texture will be different.
Conclusion
Baked Cream Cheese Chicken Taquitos are the ultimate comfort food—crispy, cheesy, and full of flavor. Whether you’re hosting a party, need a fun family dinner idea, or simply want a delicious snack, these taquitos are easy to make and absolutely irresistible. With creamy chicken filling wrapped in golden, crispy tortillas, they’re bound to become a new favorite. Enjoy them with your favorite dipping sauces and savor every bite!
PrintBaked Cream Cheese Chicken Taquitos
Baked Cream Cheese Chicken Taquitos are a crispy, creamy, and flavorful snack or meal option. Filled with shredded chicken, cream cheese, and melted cheese, these taquitos are baked to perfection for a healthier alternative to traditional fried versions. Easy to make, customizable with your favorite seasonings, and perfect for parties or family dinners, these taquitos are sure to be a crowd-pleaser!
- Prep Time: 10 minutes
- Cook Time: 20-25 minutes
- Total Time: 30-35 minutes
- Yield: Serves 4-6
- Category: Appetizer, Snack, Main Course
- Method: Baking
- Cuisine: Mexican, American
- Diet: Gluten Free
Ingredients
2 cups cooked shredded chicken (rotisserie chicken works perfectly)
4 oz cream cheese, softened at room temperature
½ cup shredded cheddar or Monterey Jack cheese
1 tablespoon taco seasoning (optional)
8 small flour tortillas
Cooking spray (or oil) for spraying
Salt and pepper, to taste
Instructions
-
Preheat the Oven: Preheat your oven to 375°F (190°C) and line a baking sheet with parchment paper or lightly grease it with cooking spray.
-
Prepare the Filling: In a medium bowl, combine the cooked shredded chicken, softened cream cheese, and shredded cheddar or Monterey Jack cheese. If using taco seasoning, add it in along with a pinch of salt and pepper. Mix everything together until fully combined and creamy.
-
Assemble the Taquitos: Warm the tortillas slightly in the microwave for about 15 seconds to make them more pliable. Spoon about 2 tablespoons of the filling onto the center of each tortilla. Roll the tortilla tightly around the filling, folding in the sides as you go to form a taquito. Repeat with the remaining tortillas and filling.
-
Bake the Taquitos: Place the rolled taquitos seam-side down on the prepared baking sheet. Lightly spray them with cooking spray or brush with a little oil for extra crispiness. Bake in the preheated oven for 15-20 minutes, or until golden brown and crispy.
-
Serve: Once baked, remove the taquitos from the oven and let them cool slightly. Serve with your favorite dipping sauces, such as salsa, guacamole, or sour cream.
Notes
Spicy Taquitos: Add diced jalapeños or hot sauce to the cream cheese filling for a spicy kick.
Vegetarian Version: Replace the chicken with black beans and corn for a vegetarian alternative.
Cheese Variety: Use different cheese such as pepper jack, mozzarella, or queso fresco for a unique flavor.
Storage/Reheating: Store leftovers in an airtight container in the fridge for up to 3 days. Reheat in the oven at 350°F (175°C) for 10-15 minutes for the crispiest texture.


